Moving a WordPress site to a new host feels risky. One wrong step and your visitors see a blank page, a database error, or — worst of all — a half-broken site that serves stale content from the old server while new orders and comments quietly vanish. The good news: with the right process, you can migrate your entire WordPress site to a new host and keep it live the whole time. This guide covers every method, from beginner-friendly plugins to the manual approach, plus the DNS propagation trick that eliminates downtime entirely.
Why Most WordPress Migrations Go Wrong
The classic migration mistake is switching DNS before the new server is ready. Once your domain’s nameservers point to the new host, every visitor — and search engine crawler — hits that server. If the database is still being imported or the wp-config.php still references the old database credentials, the site is down.
The second most common mistake is forgetting the search-replace step. WordPress stores your domain name inside the database — in post content, serialized option values, widget settings, and dozens of other places. When you move from http://oldhost.com to https://newhost.com, every one of those references needs to be updated. Skip this and you end up with broken images, links that loop back to the old host, and a stylesheet that never loads.
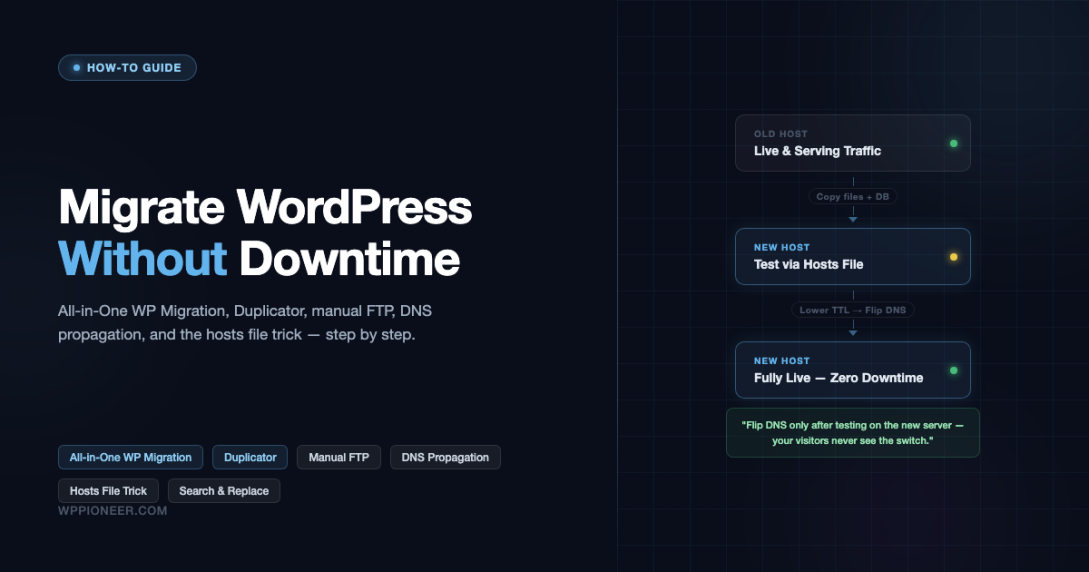
A no-downtime migration avoids both problems by keeping the old site fully live while you build, test, and verify the new one — then flipping the switch only when everything is confirmed working.
The Core Strategy: Migrate First, Switch DNS Last
Every method below follows the same high-level sequence:
- Copy all files and the database to the new server.
- Update database URLs to the new domain or temporary domain.
- Test the new site using the hosts file trick (no DNS change yet).
- Verify everything works — forms, checkout, login, media.
- Lower your DNS TTL 24 hours in advance.
- Update nameservers or A record.
- Keep the old site live until DNS fully propagates.
Your old site stays online for every visitor until step 6 completes. That is the no-downtime guarantee.
Before You Start: Back Up Everything
Before touching a single file, take a complete backup of your current site. If anything goes wrong mid-migration, a clean backup lets you restore to the working state in minutes. Use an automated backup plugin — WP-CLI, UpdraftPlus, and BackupBuddy are all solid choices. For a full comparison of your options, see our guide to the best WordPress backup plugins before you start.
Method 1: All-in-One WP Migration Plugin
All-in-One WP Migration is the most beginner-friendly migration plugin available. It exports your entire site — files, database, themes, plugins — into a single .wpress file, then imports it on the new host with one click. No FTP client, no phpMyAdmin, no SSH required.
Export from the Old Site
- Install and activate All-in-One WP Migration on your current site.
- Go to All-in-One WP Migration → Export.
- Click Export To → File. The plugin packages your entire site.
- Download the
.wpressfile to your computer. For large sites this can be several gigabytes.
Prepare the New Host
- Create a new hosting account or add-on domain on your new host.
- Install a fresh copy of WordPress on the new server. Most hosts provide a one-click WordPress installer.
- Install and activate All-in-One WP Migration on the fresh WordPress install.
Import on the New Site
- Go to All-in-One WP Migration → Import.
- Drag your
.wpressfile into the upload zone (or click to browse). - The plugin imports everything and prompts you to save your permalinks. Do so.
Upload size limit: The free version of All-in-One WP Migration caps imports at 512 MB by default. Many shared hosts set upload_max_filesize even lower. For larger sites, either purchase the Unlimited extension or use the FTP import add-on, which reads the file directly from the server filesystem and bypasses the PHP upload limit entirely.
After Import: Update Your Domain
If the new server uses a temporary URL (like server123.newhost.com/~youraccount), the imported database still references your real domain. Log in with the same credentials from your old site and navigate to Settings → General to confirm both the WordPress Address and Site Address match your intended domain. You will run the full search-replace in the database separately (covered below).
Method 2: Duplicator Plugin
Duplicator takes a different approach: it bundles your site into a ZIP archive and a PHP installer script. You upload both to the new server, visit the installer URL, and step through a wizard that handles database creation and URL replacement. Duplicator is particularly useful when you do not have shell access and need more control than All-in-One WP Migration offers.
Create a Package
- Install and activate Duplicator on the source site.
- Go to Duplicator → Packages → Create New.
- Run the scanner. It checks file sizes, database size, and server configuration. Fix any warnings marked “Critical” before continuing.
- Build the package. Duplicator creates two files:
installer.phpand a ZIP archive named with a hash. - Download both files.
Upload and Run the Installer
- Upload both files to the root directory of your new hosting account via FTP or the host’s file manager.
- Create a new, empty MySQL database on the new host and note the credentials.
- Visit
https://yournewdomain.com/installer.phpin your browser. - Step 1 (Deploy): Accept the terms, then click Next.
- Step 2 (Install): Enter the new database host, name, user, and password. Click Test Database Connection, then Next.
- Step 3 (Update Data): The wizard pre-fills your old and new URLs. Verify them, then click Update.
- Step 4 (Test Site): Click the admin and front-end links to verify everything loaded correctly.
Clean Up After Migration
After confirming the new site works, delete installer.php and the ZIP archive immediately. Leaving the installer online is a critical security vulnerability — anyone who visits the URL can overwrite your database.
Method 3: Manual Migration (FTP + phpMyAdmin)
The manual method gives you the most control and does not depend on any third-party plugin. It is the right choice for large sites (multi-gigabyte databases), complex multisite networks, or when you simply want to understand exactly what is moving where.
Step 1: Back Up Files via FTP
Connect to your current host using an FTP client like FileZilla. Download the entire public_html (or www) directory to your local machine. This includes wp-content (your themes, plugins, and uploads), wp-config.php, and all core WordPress files.
The upload directory alone can be tens of gigabytes on media-heavy sites. Plan for the transfer to take several hours on a slow connection.
Step 2: Export the Database via phpMyAdmin
- Log in to cPanel on your old host and open phpMyAdmin.
- Select your WordPress database in the left sidebar.
- Click the Export tab.
- Choose Custom export method. Set the output to gzip compression.
- Under Format-specific options, check Add DROP TABLE. This ensures a clean import with no table conflicts.
- Click Export and save the
.sql.gzfile.
Step 3: Create a New Database on the New Host
- In cPanel on the new host, go to MySQL Databases.
- Create a new database, a new user, and grant the user all privileges on the database.
- Note the database name, username, password, and host (usually
localhost).
Step 4: Import the Database
- Open phpMyAdmin on the new host and select the new empty database.
- Click the Import tab.
- Upload your
.sql.gzfile and click Go.
If the database is larger than phpMyAdmin’s upload limit (typically 50–100 MB), use the BigDump tool or ask your host to import it via SSH: mysql -u username -p database_name < backup.sql
Step 5: Upload Files to the New Server
Upload all the downloaded WordPress files to the new host’s web root via FTP. This is the slowest step. Consider using rsync over SSH if your host supports it — it is dramatically faster than FTP for large transfers and can resume after interruptions.
Step 6: Edit wp-config.php
Open wp-config.php in a text editor and update the four database constants to match your new database credentials:
Step 7: Run Search-Replace on the Database
This is the step most guides skip or under-explain. Your WordPress database contains your old domain name in hundreds of places: post content, postmeta, options, widget settings, and more. Some of these values are PHP-serialized arrays, meaning a naive find-and-replace in phpMyAdmin will break the serialized length prefix and corrupt the data.
The correct tool is WP-CLI. If you are not familiar with WP-CLI yet, the WP-CLI commands cheatsheet covers the most-used commands in one place:
The --precise flag forces WP-CLI to handle serialized data correctly. Run this once for http:// to https:// and again for the old domain to the new domain if they differ.
If you do not have WP-CLI access, use the Better Search Replace plugin — it handles serialized data safely and provides a dry-run mode so you can preview changes before applying them.
The Hosts File Trick: Test the New Site Before Any DNS Change
This is the single most important technique for a zero-downtime migration. The hosts file on your computer lets you override DNS for specific domains — only on your machine. You can visit your real domain name, see the new server, and confirm everything works, while every other person on the internet still sees the old site.
Find the New Server’s IP Address
Your new host will give you an IP address for your account. It is usually shown in the welcome email, the cPanel overview, or under DNS Zone Editor. You need the IPv4 address — something like 104.21.88.45.
Edit the Hosts File
On macOS / Linux, open a terminal and edit /etc/hosts with sudo. On Windows, open Notepad as Administrator and edit C:\Windows\System32\drivers\etc\hosts.
Add two lines at the bottom (replace the IP and domain with your own):
Save the file and flush your DNS cache. On macOS: sudo dscacheutil -flushcache; sudo killall -HUP mDNSResponder. On Windows: ipconfig /flushdns.
Now when you visit https://yourdomain.com in your browser, your computer resolves it to the new server’s IP — but everyone else still sees the old host. Browse every page, test forms, try logging in, make a test purchase if you have WooCommerce. When you are satisfied everything works, remove the hosts file entries and proceed with the DNS switch.
DNS Propagation: What It Is and How to Minimize It
DNS propagation is the time it takes for nameserver changes to spread to DNS resolvers around the world. Most resolvers cache DNS records for the duration of the TTL (Time To Live) value — a number set in your DNS zone. If your TTL is 86400 (24 hours), resolvers that cached the old IP will keep serving it for up to 24 hours after you make the change.
Lower Your TTL Before You Start
Log in to your domain registrar or DNS provider (Cloudflare, Namecheap, GoDaddy, etc.) and change the TTL on your A record to 300 seconds (5 minutes) at least 24 hours before you plan to migrate. Once you make the DNS change, propagation will complete in under 10 minutes for most of the world instead of 24 hours.
After the migration is confirmed stable, raise the TTL back to 3600 or 86400 to reduce DNS query load.
Switch Nameservers or the A Record?
If you are moving to a new host and want to use Cloudflare, keep your domain registered at your registrar, add it to Cloudflare, and just update the A record in Cloudflare’s dashboard. This is the fastest propagation path because Cloudflare’s Anycast network updates nearly instantly.
If you are moving to a host that requires their nameservers (like WP Engine or Kinsta), you must change nameservers at your registrar. This takes longer — typically 1–4 hours, occasionally up to 48 hours for older registrars. If you are still deciding which host to move to, the guide to choosing the right WordPress hosting for your budget breaks down the key differences between managed hosts, VPS, and shared hosting.
Keep the Old Site Live During Propagation
Do not cancel the old hosting account the moment you flip DNS. Keep it active for at least 48–72 hours. During propagation, some visitors will still land on the old server. If you have an e-commerce site or membership site, also pause new sign-ups or add a notice that orders placed during the transition window will be manually processed. This prevents data loss from visitors transacting on the old server while you are already serving from the new one.
SSL Certificate After Migration
If you have an SSL certificate on the old host (whether from Let’s Encrypt, your host’s free cert, or a paid certificate), you need a valid certificate on the new server before you flip DNS. Visitors hit with a browser SSL error right after a migration lose trust immediately.
Let’s Encrypt on the New Host
Most hosts provision Let’s Encrypt certificates automatically when you add a domain. However, the domain-validation challenge requires that your domain resolve to the new server’s IP. This creates a chicken-and-egg problem: you need DNS pointing at the new server to get the cert, but you do not want to point DNS until the cert exists.
The cleanest solution: use your new host’s temporary domain (e.g., server123.newhost.com/~youraccount) for testing, then trigger Let’s Encrypt issuance via your host’s cPanel immediately after the DNS change. The cert usually provisions within 60 seconds. Since TTL is already lowered to 300 seconds, the window of SSL error exposure is under 5 minutes.
Alternatively, use Cloudflare as a proxy — their edge SSL handles the browser connection even before the origin server has a valid cert, eliminating the SSL gap entirely.
Post-Migration Checklist
After DNS propagates and you can confirm the new server is live for public traffic, run through this checklist before you cancel the old account:
- Front page loads correctly, no mixed content warnings (HTTP assets on HTTPS page).
- Log in to wp-admin. Confirm user accounts and roles are intact.
- Check Settings → General: WordPress Address and Site Address both show HTTPS and the correct domain.
- Check Settings → Permalinks: save once even if you make no changes — this flushes rewrite rules.
- Verify at least 10 posts and pages load with correct content and images.
- Test contact form submission (check that emails are delivered from the new server’s SMTP).
- If WooCommerce is active: place a test order through to the thank-you page.
- Check Google Search Console: add the new host’s property if the URL changed, or re-verify if nameservers changed.
- Run the site through GTmetrix or PageSpeed Insights to confirm performance is equal or better.
- Check all redirects — if you have an .htaccess redirect file, verify it was copied correctly.
- Confirm your caching plugin is active and configured for the new server’s environment.
- Verify your backup plugin is active and scheduled on the new host.
Handling Email During Migration
If your domain’s email ([email protected]) is hosted on the same server as WordPress, a nameserver change will also move your MX records to the new host — unless you take action first.
Before changing nameservers, export your email accounts and set up identical accounts on the new host. If you are moving to Cloudflare, you can keep the old MX records pointing to the existing mail server while only the A record changes to the new web server. This keeps email uninterrupted.
If you use Google Workspace or Microsoft 365 for email, your MX records are already separate from your web hosting. They will survive a nameserver change intact — just make sure the new DNS zone at your new host or Cloudflare has the correct MX, DKIM, DMARC, and SPF records before you switch.
Common Migration Errors and How to Fix Them
Error establishing a database connection
This almost always means wp-config.php still has the old database credentials. Open it on the new server and verify DB_HOST, DB_NAME, DB_USER, and DB_PASSWORD match what you set up on the new host.
White screen of death (WSOD) after migration
Usually a PHP version mismatch or a plugin incompatibility. Enable WP_DEBUG in wp-config.php and add define('WP_DEBUG_LOG', true); to write errors to wp-content/debug.log. The log will show you exactly which plugin or theme is throwing the fatal error.
Images not loading / broken media
Either the wp-content/uploads folder was not fully transferred, or the file permissions are wrong. Uploads should be 644 for files and 755 for directories. Run the search-replace again to make sure image URLs reference the new domain, not the old one.
Redirect loop after migration
Usually caused by a misconfigured SSL setting. In wp-config.php, check if define('FORCE_SSL_ADMIN', true); is set but the server is not actually serving HTTPS. Also check the siteurl and home values in the wp_options table — they should both start with https:// and match exactly.
Admin login redirects to the old domain
The search-replace did not complete fully. The siteurl and home options in wp_options still reference the old domain. Run WP-CLI search-replace again or manually update them in phpMyAdmin.
Choosing the Right Method for Your Site
| Site Type | Best Method | Why |
|---|---|---|
| Small blog, under 500 MB | All-in-One WP Migration | Fastest, no technical knowledge required |
| Medium site, no shell access | Duplicator | Handles URL replacement, good wizard UI |
| Large site, over 1 GB | Manual (rsync + WP-CLI) | No upload size limits, fastest file transfer |
| E-commerce (WooCommerce) | Manual or Duplicator | Full database control, safer for order data |
| Multisite network | Manual | Plugins cannot reliably handle multisite mapping |
| Moving to managed host (WP Engine, Kinsta) | Host’s migration service | Free, handled by the host’s technical team |
Using a Staging Environment Instead of a Temporary Domain
Most managed WordPress hosts (and many shared hosts) now offer one-click staging environments. Instead of setting up a fresh WordPress install on a temporary subdomain and running a migration plugin, you simply clone your live site to staging, make any configuration changes, verify with the hosts file trick, and then push the staging environment live — the host handles all the file and database swapping internally. This is the cleanest zero-downtime option if your host supports it.
Hosts that offer this as a standard feature include WP Engine, Kinsta, Flywheel, SiteGround, and Cloudways. The process is typically: Dashboard → Staging → Create → test → Push to Live. The “push to live” step replaces the production database and files atomically, meaning there is no window where the site is partially old and partially new.
Before You Migrate: Pre-Migration Cleanup
A migration is a perfect time to clean up the database and file system before copying everything to a new server. Running these steps on the old site reduces transfer time and eliminates garbage data from the new environment.
- Delete unused plugins and themes. Inactive plugins still add tables and options to the database. Remove them completely before exporting.
- Clear transients. Use a plugin like WP-Optimize or run
wp transient delete --allvia WP-CLI. Transients are cached database queries with expiry times — they add bulk to the export and expire anyway on the new host. - Clean post revisions. WordPress stores every revision of every post. On old sites this can add thousands of rows. Run
wp post delete $(wp post list --post_type=revision --format=ids)via WP-CLI or use WP-Optimize to bulk-delete revisions. - Empty the spam and trash. Akismet spam comments, trashed posts, and deleted media all get exported. Clean them before you migrate.
- Optimize database tables. Run an OPTIMIZE TABLE on all WordPress tables via phpMyAdmin or WP-CLI to reduce the export file size.
Step-by-Step Summary: The Zero-Downtime Playbook
- 48 hours before: Lower DNS TTL to 300 seconds at your domain registrar or DNS provider.
- 48 hours before: Clean up the old site (delete unused plugins, clear transients, optimize tables).
- Migration day: Copy all files and export the database from the old host.
- Migration day: Import the database and upload files to the new host.
- Migration day: Update wp-config.php on the new host with new database credentials.
- Migration day: Run search-replace to update the domain in the database.
- Migration day: Edit your local hosts file to test the new site at your real domain.
- Migration day: Test everything: front end, admin, forms, checkout, media, email.
- Migration day: When satisfied, update the A record or nameservers.
- Post-migration (first hour): Monitor the new site for errors. Keep the old host online.
- 72 hours later: Confirm the old host is no longer receiving traffic, then cancel the old plan.
- After cancellation: Raise DNS TTL back to 3600 or 86400.
Frequently Asked Questions
Can I migrate a WordPress site without plugins?
Yes. The manual method (FTP + phpMyAdmin + WP-CLI search-replace) requires no migration plugin. It is more steps but gives you full control and no file size limits.
How long does WordPress migration take?
A small site (under 500 MB) takes 30–60 minutes from start to DNS flip. A large site (5+ GB) can take 3–6 hours for file transfer alone. The actual DNS switch is instant — propagation time depends on your TTL.
Will I lose SEO rankings from migrating?
Not if you preserve your URLs. If the slug structure stays the same (it should, unless you deliberately change it), Google sees no content change — just a different server responding to the same URLs. Rankings are unaffected. The risk is only if URLs change or if the site is inaccessible during crawl time.
What about migrating from HTTP to HTTPS at the same time?
You can do both in one migration. Run the search-replace for both the old domain and the HTTP-to-HTTPS change in the same pass. Make sure the SSL certificate is provisioned and valid on the new host before you flip DNS, and add the HTTPS redirect in .htaccess as part of the migration setup.
Do I need to update Google Analytics and Search Console?
If only the hosting changes and the URL stays the same (same domain, same HTTPS), there is nothing to update in Analytics or Search Console. If the domain changes, add the new domain as a property in Search Console and use the Change of Address tool under Settings to signal the move to Google.
What should I set up on the new host before launching?
After confirming the new site works, set up your backup schedule right away. Immediately after a migration is one of the most vulnerable periods for a site — you have not yet established a backup history on the new server. The automated WordPress backup setup guide walks through configuring scheduled backups so you are protected from day one on the new host.
Ready to Migrate Without the Stress?
A WordPress migration does not have to mean downtime, lost data, or broken pages. Whether you use All-in-One WP Migration for a quick plugin-based move, Duplicator for wizard-guided control, or the manual FTP and phpMyAdmin approach for large or complex sites, the process is manageable when you work through it step by step.
The hosts file trick alone — preview the new server at your real domain before any DNS change — removes the single biggest source of migration anxiety. Pair it with a 300-second TTL and you have a setup where even if something goes wrong, you can roll back in minutes, not hours.
Take your time with the pre-migration cleanup, document your database credentials carefully, and run the search-replace before you test anything. Most migration failures trace back to one of those three things being rushed.
For more guides on managing, optimizing, and troubleshooting WordPress, explore the rest of WP Pioneer’s how-to library.
All-in-One WP Migration DNS Propagation Duplicator Plugin WordPress Migration Zero Downtime Migration
Last modified: April 10, 2026


")