So, you’re building your WordPress website, happily uploading beautiful images, banners, videos, and your digital art gallery. But wait… suddenly your site feels sluggish. Pages load like it’s 2003 dial-up internet. What happened?
Welcome to the world of media bloat, where oversized images, outdated formats, and unused files silently drag your website down. But don’t worry! Even if you’re starting from absolute scratch, this guide will take you to the pro level on how to master the Media Library without slowing down your site.
Let’s dive right into it.
Why Uploading Unoptimized Media Causes Performance Nightmares
The WordPress Media Library is your visual content manager. But if you treat it like a junk drawer, dumping in massive image files, multiple duplicates, and unused videos, your website’s performance is going to suffer.
When your site loads slowly, it’s often due to:
- Images that are too large in dimensions or file size
- Outdated formats like BMP or uncompressed PNGs
- Unattached or unused media files cluttering your server
- Manual replacements that break existing links across pages
Even if you’re not tech-savvy, optimizing your media is easier than you think. Here’s how to get it right.
Uploading and Editing Images Properly
Most people just drag and drop their images into WordPress and move on. But that’s like tossing raw ingredients into a pan and expecting a gourmet meal.
Do this instead:
- Resize Before Upload: If your content section only displays an 800×600 image, don’t upload a 4000×3000 image. Resize it first.
- Use Descriptive File Names: Instead of IMG_1001.jpg, use chocolate-cake-recipe.jpg. It’s better for SEO and file management.
- Fill In Alt Text: Crucial for accessibility and SEO. Every image should have meaningful alt text.
- Avoid On-the-Fly Cropping: WordPress lets you crop, rotate, and scale images, but this doesn’t reduce the underlying file size.
Image Size Best Practices (Dimensions and File Size)
Your images should be exactly the size they need to be. Nothing more. Here are general size guidelines:
- Header Banners: Max 1920px wide, under 200KB
- Blog Thumbnails: Max 800px wide, under 100KB
- Icons & Logos: Use SVGs when possible (super lightweight and resolution-independent)
- Full-Width Backgrounds: Compress aggressively, aim for under 300KB
General Rule of Thumb:
- Try to keep most images under 100KB
- Avoid images over 500KB, unless it’s high-resolution and essential
Why You Should Start Using WebP
JPEG and PNG are becoming outdated. WebP is a modern image format that maintains quality while drastically reducing file size.
Benefits of WebP:
- 25–35% smaller than JPEG or PNG
- Supports transparency like PNG
- Supported by all modern browsers
- Greatly improves site speed
How to Convert to WebP:
- Use free tools like Squoosh
- Use WordPress plugins like ShortPixel, Imagify, or WebP Express
- Some hosts (Cloudflare, SiteGround) serve WebP automatically, check with your provider
Tools for Compressing Images Automatically
Manually compressing every image is tedious. These plugins automate the process and offer additional features:
1. ShortPixel
- Bulk compression
- WebP conversion
- Lossy/lossless options
2. Imagify
- Beautiful UI
- Automatic resizing on upload
- WebP support included
3. Smush
- Free version available
- Bulk optimization for 50 images at a time
- Lazy loading and directory smushing
Pro Tip: Always back up your site before running bulk image optimization.
Managing Unused Media Files (Digital Dustbins)
Images that aren’t used still live on your server, clogging up space. WordPress doesn’t clean these up automatically.
Cleanup Methods:
- Media Cleaner Plugin: Scans your Media Library for unused items
- WP-Optimize: Includes media cleanup among other performance tools
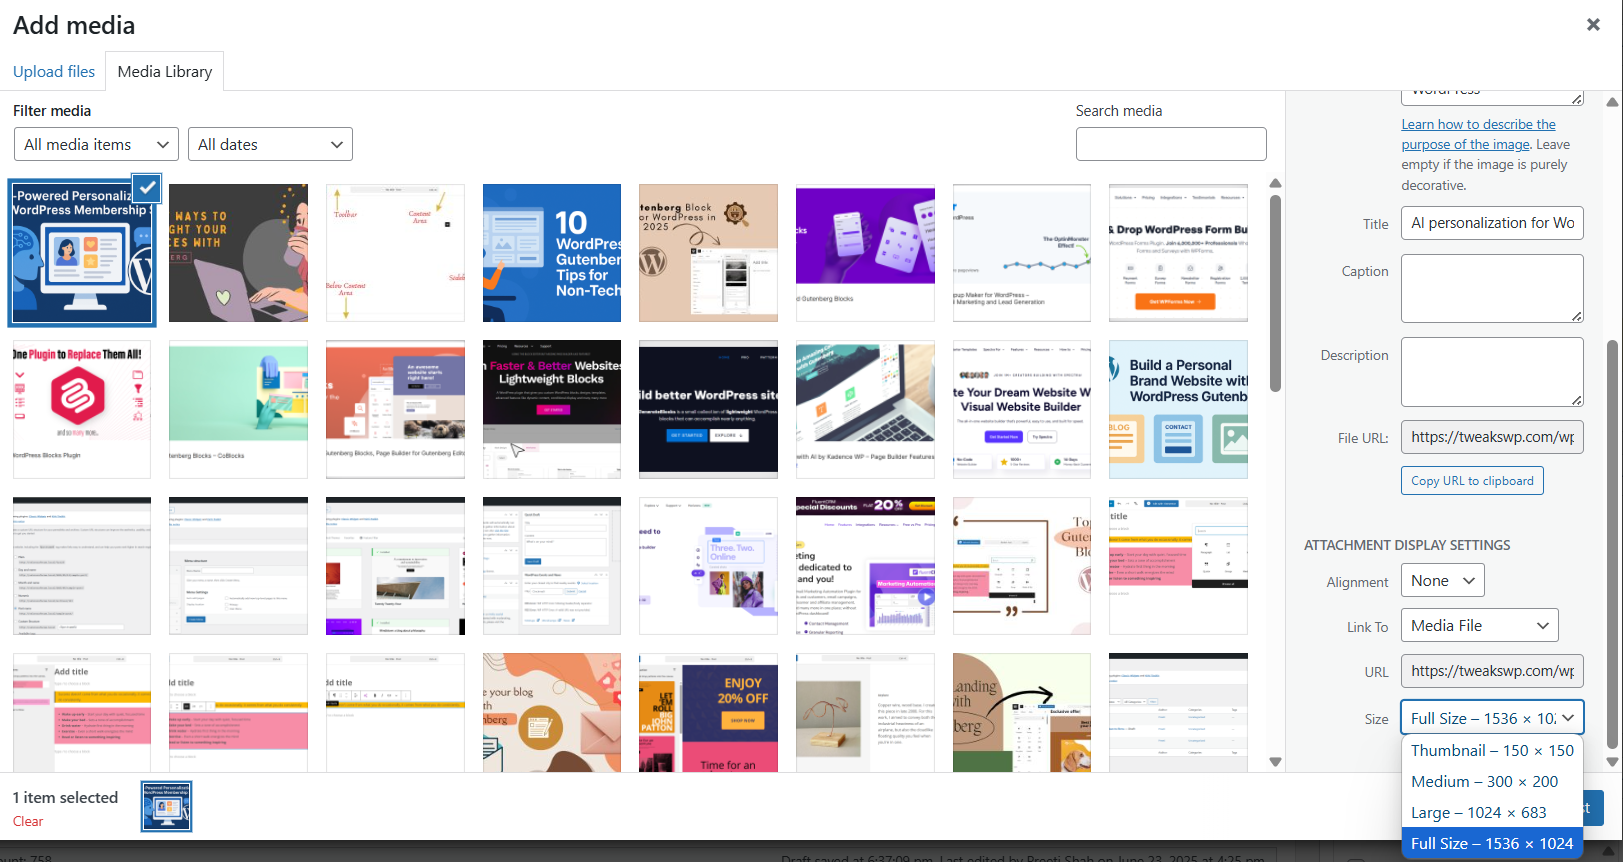
- Manual Cleanup: Switch to “List View” in the Media Library to see where files are attached. Delete unused files carefully.
Caution: Some images are used in widgets, background sections, or theme settings. Double-check before deleting.
Replacing Existing Files Without Breaking Links
Uploading a new image and deleting the old one often leads to broken links.
Solution:
Use Enable Media Replace plugin:
- Seamlessly replace old images with new ones
- Keeps the same URL
- Avoids breaking posts/pages where the image is used
- Improves workflow for blog updates, portfolios, product pages
Organizing Media with Folders and Categories
The default Media Library has no folder structure. As your site grows, managing thousands of files gets messy.
Best Plugins for Organizing Media:
- FileBird: Drag-and-drop folder creation, seamless UI
- Media Library Folders: Adds folder views within the Media Library
- HappyFiles: Lightweight media category manager
These tools don’t change your physical directory, but they make managing media much easier inside WordPress.
Offloading Media to Save Server Space
Hosting tons of media on your server can slow it down and lead to costly overages.
Offload Solutions:
- Use a CDN: Cloudflare, BunnyCDN, or Jetpack CDN can serve images faster
- Media Offload Plugins: Like WP Offload Media to move files to Amazon S3, Google Cloud, or DigitalOcean Spaces
- Hybrid Solutions: Use your server for low-volume images and CDN for heavier assets
Benefits:
- Reduces server load
- Improves global delivery speeds
- Frees up disk space
Lazy Load Images for Faster Initial Loads
Lazy loading delays image loading until the user scrolls to it. This improves initial load speed significantly.
How to Implement:
- Use a plugin like WP Rocket, LiteSpeed Cache, or a3 Lazy Load
- Enable the built-in lazy load feature in WordPress 5.5+
Limit Image Upload Permissions for Non-Admins
If you allow contributors or editors to upload media, they may unknowingly add large, unoptimized files.
Control with Plugins:
- User Role Editor: Customize who can upload and manage files
- WP Limit Login/Upload: Prevent large uploads from non-admins
Good governance = faster websites.
Bonus Tips for a Cleaner, Faster Media Library
- Name files properly: Avoid screenshot123.png. Use how-to-use-media-library.png
- Delete duplicates: Use Media Deduper or organize folders to identify redundant files
- Schedule media audits: Periodically review and clean up old uploads
- Serve images in next-gen formats: Enable WebP or AVIF if supported
Conclusion
A slow site isn’t just annoying. It hurts your SEO, frustrates visitors, and damages your reputation. The good news? You don’t need to be a developer to manage your media library like a pro.
Just follow these steps:
- Resize and compress your images before upload
- Use modern formats like WebP
- Automate compression with plugins
- Replace files smartly to preserve links
- Organize your media with folders and categories
- Offload to CDNs when needed
- Lazy load content
- Regularly audit and clean up unused media
A well-optimized Media Library = a faster, cleaner, more professional website. Start implementing these tips today and feel the difference.
Recommended Tools Recap:
- ShortPixel, Imagify, Smush (compression)
- Enable Media Replace (safe file swapping)
- FileBird, HappyFiles (media folders)
- WP Offload Media (cloud storage)
- WP Rocket, LiteSpeed Cache (lazy load + caching)
Master your media, and your website will thank you!
Beginner WordPress Tips Image Optimization Page Load Time Website Speed WordPress Media Library WordPress settings
Last modified: June 23, 2025