
You clicked “Update All” on a Tuesday morning. Within seconds, your site goes blank. Visitors see a white screen. Your heart drops.
This happens more often than you think. WordPress core updates, plugin updates, theme updates — any one of them can trigger a conflict that takes down your site. The good news is that recovery is almost always possible, and this guide walks you through every step in the right order.
Keep this page bookmarked. You may not need it today, but you will eventually.
The First 60 Seconds: Stay Calm and Take Stock
Before you do anything, slow down. Panic leads to bad decisions like overwriting a backup that still contains your content, or making changes that compound the original problem.
Here is what to do in the first minute:
- Open a new browser tab and load your site. Confirm it is actually broken and you are not just seeing a cached version in the current tab.
- Check your WordPress admin. Go to
yourdomain.com/wp-admin. Can you log in? A working admin panel means you have a lot more options. - Note exactly what updated. If you still have the browser tab open where you ran the update, look at what changed. Was it WordPress core? A specific plugin? The theme? This tells you where to start.
- Do not run any more updates. Stop right there. Do not try to fix things by updating more plugins.
The type of failure you see gives you a clue about what broke:
- White screen (blank page): Usually a PHP fatal error. A plugin or theme is running code that crashes PHP before the page can render.
- “There has been a critical error on this website”: WordPress detected a fatal error and is showing its own error screen. Usually includes a link to the recovery email.
- Broken layout (CSS missing): Often the theme, a page builder plugin, or a CDN/caching issue.
- Admin works but the front end is broken: Usually a plugin or theme conflict affecting only public-facing output.
- Front end works but admin is broken: Less common, but usually a plugin conflict in the backend.
Enable WP_DEBUG to Find the Actual Error
Your first real diagnostic step is to turn on WordPress debugging. This tells PHP to display (or log) the exact error instead of a blank screen.
How to Enable WP_DEBUG
Open your wp-config.php file. You can do this via FTP, cPanel File Manager, or SSH. Look for this line:
define( 'WP_DEBUG', false );Change it to:
define( 'WP_DEBUG', true );
define( 'WP_DEBUG_LOG', true );
define( 'WP_DEBUG_DISPLAY', false );
Setting WP_DEBUG_DISPLAY to false keeps errors out of the browser (so visitors do not see raw PHP errors) while writing them to wp-content/debug.log. Once you have this in place, reload your site and then check the log file.
The error log will tell you exactly which file and which line of code caused the problem. You will see something like:
PHP Fatal error: Uncaught Error: Call to undefined function wp_is_mobile() in /home/user/public_html/wp-content/plugins/some-plugin/functions.php on line 47That tells you the plugin named “some-plugin” is the culprit. Now you know exactly where to focus.
Check Your Hosting Error Logs Too
Your hosting control panel also keeps PHP error logs independent of WordPress. In cPanel, look under Logs > Error Log. In Kinsta, go to Sites > Logs. In SiteGround, use the Error Log Viewer in the Site Tools. These logs often contain the same information but can be easier to read than the WordPress debug log.
Diagnosing: Which Type of Break Are You Dealing With?
White Screen of Death
The white screen is the most common post-update failure. It almost always means a PHP fatal error. Once you have WP_DEBUG enabled and the log points to a specific plugin or theme file, you can fix it by deactivating that plugin or switching the theme. (A blank white screen can also appear on the login page — if that is your situation, see our guide on fixing the WordPress login blank screen.)
Fatal Error Screen (WordPress Recovery Mode)
Newer versions of WordPress (5.2 and above) catch fatal errors and show a friendlier message with a link to enter “recovery mode.” If you see this, check your admin email — WordPress sends a direct link that lets you log into the admin and deactivate the problem plugin or switch themes without needing FTP.
Broken Layout or Missing Styles
If your site loads but looks completely unstyled (raw HTML, no colors, broken images), the problem is usually one of these:
- A caching plugin serving an old version of CSS files. Clear all caches first.
- A theme update that changed CSS file names. The old cached references now 404.
- A CDN serving stale assets. Log into your CDN dashboard and purge the cache.
- A page builder plugin update that changed how it outputs styles. Deactivate and reactivate the page builder.
Missing Content
If your content has disappeared, this is usually a database-level problem or a caching issue. Check whether the content still exists in the WordPress admin editor. If it does, the issue is with the front end display (a plugin or theme rendering problem). If the content is gone from the editor too, you are dealing with a database issue and need to restore from backup.
Disabling All Plugins via FTP or cPanel
If you cannot access your WordPress admin, disabling plugins via FTP or the file manager is your fastest path to getting back in.
The Rename Method
WordPress loads plugins from the wp-content/plugins/ directory. If that folder has a different name, WordPress simply skips all plugins entirely.
- Connect to your site via FTP (using FileZilla, Cyberduck, or your hosting’s built-in file manager).
- Navigate to
wp-content/. - Find the folder named
plugins. - Rename it to
plugins_disabled(or anything other than “plugins”). - Try to load your WordPress admin or front end.
If your site comes back, one of your plugins was the culprit. Now rename the folder back to plugins, then go to your WordPress admin and reactivate plugins one at a time, reloading your site after each one. The plugin that breaks your site again is the one that caused the original problem.
Disabling a Single Plugin via FTP
If you already know which plugin is the problem (from the error log), you can rename just that plugin’s folder instead of all of them. Navigate to wp-content/plugins/problem-plugin-name/ and rename it to problem-plugin-name_disabled.
Switching to a Default Theme via the Database
If a theme update caused the problem and you cannot access your admin, you can force WordPress to use a default theme by editing two rows in the database.
Using phpMyAdmin
- Log into your hosting cPanel and open phpMyAdmin.
- Select your WordPress database from the left panel.
- Click on the
wp_optionstable (your table prefix may differ, e.g.,mysite_options). - Use the search bar to find the row where
option_name = 'template'. Edit this row and change the value totwentytwentyfour. - Find the row where
option_name = 'stylesheet'. Change this value totwentytwentyfouras well. - Save both changes.
WordPress will now load the Twenty Twenty-Four default theme. Your admin should be accessible again. Make sure the twentytwentyfour folder actually exists in wp-content/themes/ — if it does not, upload it via FTP first (download it from wordpress.org/themes/twentytwentyfour).
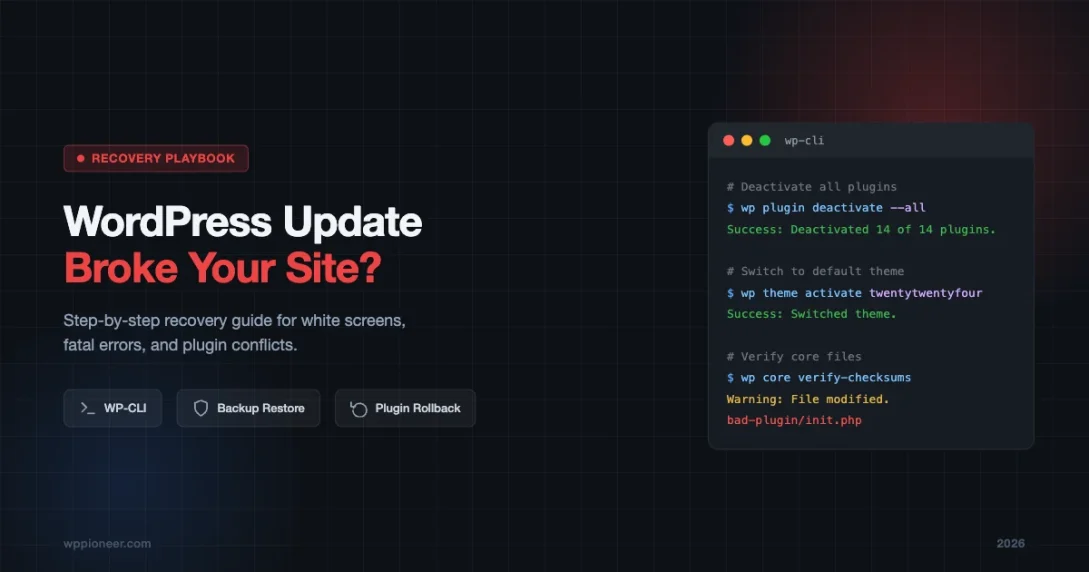
Using WP-CLI to Troubleshoot
If you have SSH access to your server, WP-CLI is one of the fastest ways to diagnose and fix update problems. Here are the most useful commands:
Deactivate All Plugins
wp plugin deactivate --allThis deactivates every plugin without touching any files. Your admin should become accessible immediately after running this.
Reactivate Plugins One by One
wp plugin list
wp plugin activate plugin-name
Use wp plugin list to see all plugin slugs, then activate them one at a time to find the one causing the conflict.
Switch to a Default Theme
wp theme activate twentytwentyfourCheck the WordPress Version
wp core versionCheck for Core File Changes
wp core verify-checksumsThis compares your WordPress core files against the official checksums from wordpress.org. If any core files have been modified (whether by a bad update or something else), this will flag them.
View Recent Error Log Entries
wp eval 'error_log("test");' && tail -n 50 /home/user/public_html/wp-content/debug.logReplace the path with your actual wp-content path.
Rolling Back a Plugin Update
Once you know which plugin caused the problem, you have two options: keep it deactivated while the developer releases a fix, or roll back to the previous version.
Option 1: WP Rollback Plugin
The WP Rollback plugin (free, from WordPress.org) lets you roll back any plugin or theme to a previous version directly from your WordPress admin. After installing it:
- Go to Plugins > Installed Plugins.
- Find the problem plugin. You will see a new “Rollback” link next to it.
- Click Rollback, select the previous version from the dropdown, and confirm.
This downloads the older version from wordpress.org and replaces the current installation.
Option 2: Manual FTP Replacement
If you cannot use a plugin (because the admin is still inaccessible):
- Go to the WordPress plugin directory at
https://wordpress.org/plugins/plugin-slug/advanced/and download the older version you need. - Unzip the file on your computer.
- Connect via FTP and navigate to
wp-content/plugins/. - Rename the current (broken) plugin folder to something like
plugin-name_broken. - Upload the older version’s folder to
wp-content/plugins/. - The plugin will be active again with the old code.
Rolling Back WordPress Core
Core updates very rarely break sites on their own — most of the time, core updates expose incompatibilities in plugins or themes. But if the core update itself is the problem, you can roll back.
Download a Previous Version
Go to wordpress.org/download, scroll to the bottom, and click the “Release Archive” link to browse all previous WordPress versions. Download the .zip file for the version you were running before the update. You can find your previous version number in your hosting’s backup files or by checking the update history in your WordPress admin (Dashboard > Updates).
How to Manually Replace Core Files
- Download and unzip the WordPress package on your computer.
- Delete the
wp-contentfolder from the unzipped package — you do not want to overwrite your content, plugins, or themes. - Also delete
wp-config-sample.phpfrom the package. - Connect via FTP and upload the remaining files to your server root, overwriting existing files.
This replaces the WordPress core files without touching your database, uploads, plugins, or themes.
Using WP-CLI to Downgrade Core
wp core download --version=6.4.3 --forceReplace 6.4.3 with the version you want to restore. The --force flag tells WP-CLI to overwrite the existing core files.
Restoring from Backup
If deactivating plugins and switching themes does not solve the problem, or if content has been lost from the database, restoring from backup is the right call.
When to Use a Backup vs. Fixing the Conflict
Use a backup when:
- Database content has been deleted or corrupted.
- You cannot identify the problem after 30+ minutes of troubleshooting.
- Multiple things are broken at once and the root cause is unclear.
Try to fix the conflict first when:
- You know exactly which plugin or theme caused the problem.
- No content has been lost.
- You have made recent changes that would be lost if you restore (new posts, orders, form submissions).
Restoring via Your Hosting Panel
Most managed WordPress hosts and cPanel-based hosts let you restore a backup with a few clicks:
- Kinsta: Sites > Backups > Restore. Kinsta keeps daily backups for 14-30 days.
- WP Engine: Sites > Backup Points > Restore.
- SiteGround: Site Tools > Security > Backups > Restore.
- Bluehost/HostGator: cPanel > File Manager or Softaculous for full backup restores.
- Generic cPanel: Backup Wizard in cPanel lets you restore a full account backup or just the database.
Manual Database Restore
If you have a manual database backup (a .sql file):
- Open phpMyAdmin.
- Select your WordPress database.
- Click Import at the top.
- Choose your .sql file and click Go.
This replaces the current database contents with the backup. Make sure you also restore your files (plugins, themes, uploads) to the matching backup version if content was affected.
Manual File Restore via FTP
If you have a full site backup as a zip file, extract it on your computer, then upload the files via FTP to overwrite the current state. Pay attention to file permissions — directories should typically be 755 and files should be 644.
Who to Contact: Host vs. Plugin Developer vs. Theme Developer
After you have stabilized your site, you need to figure out the long-term fix. Here is how to route that correctly:
Contact Your Host When:
- The PHP version your host recently changed is incompatible with your plugins.
- Server-level errors appear in the error log (500 errors without a clear plugin/theme cause).
- Your backup restore failed or the backup itself is corrupted.
- The host’s automatic update system updated something you had not approved.
Contact the Plugin Developer When:
- You confirmed the plugin update caused the error by rolling back and confirming the site works.
- The error message in the debug log points to a file inside that plugin’s directory.
- The plugin’s support forum on wordpress.org shows other users reporting the same issue after the same update.
When reporting to a plugin developer, include: your WordPress version, PHP version, the exact error message from your debug log, and the plugin version that broke things vs. the one that worked.
Contact the Theme Developer When:
- Switching to a default theme fixes the problem.
- The error log points to a file in your theme or child theme directory.
- The theme update changelog mentions major changes to template files.
Checking the WordPress Support Forums Before You Update
One habit that saves hours of recovery work: check the plugin’s support forum on WordPress.org before applying an update. After a developer releases a new version, it usually takes 24 to 48 hours for real-world problems to surface in the forum. If an update is going to cause trouble, other users will post about it first.
To do this quickly, go to https://wordpress.org/support/plugin/plugin-slug/ (replace “plugin-slug” with the actual slug) and filter threads by the last two days. Look for posts mentioning site broken, blank screen, or fatal error. If you see a cluster of recent complaints, wait for the developer to release a patch before updating on your live site.
For WordPress core updates, the same principle applies. Check the WordPress.org support forums after a major release. Minor releases (e.g., 6.x.1) are usually safe to apply immediately since they are security and bug fixes. Major releases (e.g., 6.5 to 6.6) carry more risk and are worth testing on staging first.
Prevention: Test Updates on Staging Before Going Live
The best recovery strategy is not needing to recover at all. A staging environment lets you test updates on a copy of your site before applying them to the live version.
What Is a Staging Site?
A staging site is an exact copy of your live site running on a separate URL (usually something like staging.yourdomain.com or yourdomain.com/staging). You apply updates there first, verify everything works, and only then update the live site.
How to Create a Staging Site
Using your hosting panel: Most managed WordPress hosts (Kinsta, WP Engine, SiteGround, Flywheel) have a one-click staging feature. Look for a “Staging” or “Dev Site” option in your hosting dashboard.
Using a plugin: Plugins like WP Staging (free version available) create a local staging copy within your own server. This is not as good as a separate server environment but works for basic testing.
Using Local (by WP Engine): The free Local app lets you pull a copy of your live site down to your computer for local testing, including running updates.
A Practical Update Workflow
- Push live site to staging. Most hosting platforms have a one-click “sync to staging” button.
- Apply all updates on staging. Click Update All in the staging admin.
- Test the key pages. Home page, a few posts, your shop (if applicable), the contact form, the login/logout flow.
- If staging passes, update live. Apply the same updates on the live site, then do a quick check of the same pages.
- Keep at least one backup from before the update. Most hosts keep daily backups automatically, but download a manual backup to your computer before major updates.
Automating Backups Before Updates
If you use a backup plugin like UpdraftPlus, you can configure it to create an automatic backup before any update runs. In UpdraftPlus, go to Settings > UpdraftPlus Backup > Advanced Tools and enable “Create a backup before updates are run.” This gives you a clean restore point automatically without having to remember to do it manually.
Quick Reference: The Recovery Order of Operations
When your site breaks after an update, work through these steps in this order. Stop as soon as the site is back:
- Check
wp-admin— can you log in? - If yes: go to Plugins, deactivate the plugin that just updated, reload the site.
- If the admin is inaccessible: enable WP_DEBUG, check the error log, identify the problem plugin or theme.
- Disable plugins via FTP (rename the plugins folder).
- If still broken: switch to a default theme via the database.
- If still broken: run
wp core verify-checksumsvia WP-CLI to check core files. - If still broken or data is missing: restore from backup.
- After restoring: identify the conflicting component, report it to the developer, and do not reactivate it until a fix is released.
Wrapping Up
A broken site after a WordPress update is stressful, but it is almost always fixable. The key is working methodically from the error log outward: identify the broken component, isolate it, restore the working state, then figure out the long-term fix.
The single biggest thing you can do to protect yourself is to have a reliable backup system in place and a staging environment for testing updates. Both are free or very low cost with most hosting plans. Set them up before you need them, and a broken update becomes a 10-minute inconvenience instead of a full recovery operation.
If your site problems go beyond a broken update — for example, if you find unexpected redirects, strange admin users, or modified files after recovery — you may be dealing with a security issue. Read our guide on how to fix a hacked WordPress site and what to do about WordPress redirect hacks to rule out anything more serious.
Beginner WordPress Tips WordPress Troubleshooting WordPress Update Recovery WordPress White Screen Fix
Last modified: April 29, 2026


Beginner’s Guide • How-To Guides • Site Maintenance Basics
April 29, 2026 • Views: 0
How to Moderate WordPress Comments Without Checking Them Every Day