
You just launched your WordPress site and you need a contact form. The obvious advice is to install Contact Form 7 or WPForms. But what if your site is already running 20+ plugins? What if you are on a managed host that throttles plugin counts? What if you just want to keep things lean?
The good news: you have at least five solid paths to a working contact form without touching the Plugins screen. This guide walks through each one, with real code where it matters.
Before You Install Anything, Check What You Already Have
Many WordPress sites already have a form plugin installed and the owner has forgotten about it. Before building anything, go to Plugins > Installed Plugins and look for:
- WPForms Lite or WPForms Pro
- Gravity Forms
- Ninja Forms
- Formidable Forms
- HubSpot (it ships with a form builder)
- Jetpack (includes a contact form module)
If any of these are active, your contact form is a few clicks away. In WPForms Lite, go to WPForms > Add New, pick the Simple Contact Form template, and drop the [wpforms id="X"] shortcode on any page. In Gravity Forms, go to Forms > New Form, build the fields, then embed via the Add Form block or shortcode. You are done without adding a single new plugin.
If nothing is installed, keep reading. Here are five methods that require zero new plugins.
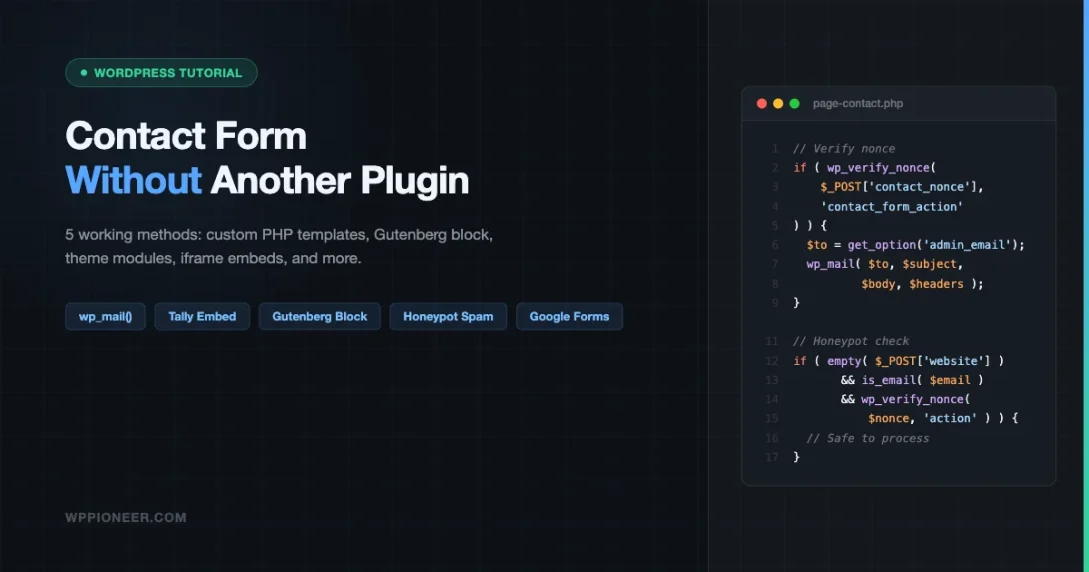
Method 1: Custom Page Template with HTML Form and wp_mail()
This is the most reliable no-plugin approach for developers or anyone comfortable with a small amount of PHP. You create a custom page template, add a standard HTML form, and use WordPress’s built-in wp_mail() function to send the submission to your inbox.
Step 1: Create the Template File
In your theme folder (or a child theme folder), create a file called page-contact.php. The file needs a template comment at the top so WordPress recognizes it:
<?php
/**
 * Template Name: Contact Page
 */

if ( isset( $_POST['contact_submit'] ) ) {
    // Verify nonce
    if ( ! isset( $_POST['contact_nonce'] ) ||
         ! wp_verify_nonce( sanitize_text_field( wp_unslash( $_POST['contact_nonce'] ) ), 'contact_form_action' ) ) {
        wp_die( 'Security check failed. Please go back and try again.' );
    }

    $name    = sanitize_text_field( wp_unslash( $_POST['contact_name'] ?? '' ) );
    $email   = sanitize_email( wp_unslash( $_POST['contact_email'] ?? '' ) );
    $message = sanitize_textarea_field( wp_unslash( $_POST['contact_message'] ?? '' ) );

    // Basic honeypot check
    if ( ! empty( $_POST['website'] ) ) {
        wp_die( 'Bot detected.' );
    }

    if ( empty( $name ) || empty( $email ) || empty( $message ) ) {
        $error = 'All fields are required.';
    } elseif ( ! is_email( $email ) ) {
        $error = 'Please enter a valid email address.';
    } else {
        $to      = get_option( 'admin_email' );
        $subject = 'New Contact Form Submission from ' . $name;
        $body    = "Name: $name\nEmail: $email\n\nMessage:\n$message";
        $headers = array(
            'Content-Type: text/plain; charset=UTF-8',
            'Reply-To: ' . $name . ' <' . $email . '>',
        );

        $sent = wp_mail( $to, $subject, $body, $headers );
        if ( $sent ) {
            $success = 'Thank you! Your message has been sent.';
        } else {
            $error = 'Something went wrong. Please try again or email us directly.';
        }
    }
}

get_header();
?>

<main id="primary">
<?php while ( have_posts() ) : the_post(); ?>
    <article>
        <h1><?php the_title(); ?></h1>
        <?php the_content(); ?>

        <?php if ( ! empty( $success ) ) : ?>
            <p style="color:green;"><?php echo esc_html( $success ); ?></p>
        <?php elseif ( ! empty( $error ) ) : ?>
            <p style="color:red;"><?php echo esc_html( $error ); ?></p>
        <?php endif; ?>

        <form method="post" action="">
            <?php wp_nonce_field( 'contact_form_action', 'contact_nonce' ); ?>

            <!-- Honeypot field: hidden from real users -->
            <div style="display:none;">
                <label for="website">Leave this blank</label>
                <input type="text" id="website" name="website" autocomplete="off">
            </div>

            <label for="contact_name">Your Name</label>
            <input type="text" id="contact_name" name="contact_name"
                   value="<?php echo esc_attr( $_POST['contact_name'] ?? '' ); ?>"
                   required>

            <label for="contact_email">Email Address</label>
            <input type="email" id="contact_email" name="contact_email"
                   value="<?php echo esc_attr( $_POST['contact_email'] ?? '' ); ?>"
                   required>

            <label for="contact_message">Message</label>
            <textarea id="contact_message" name="contact_message" rows="6" required
                      ><?php echo esc_textarea( $_POST['contact_message'] ?? '' ); ?></textarea>

            <input type="hidden" name="contact_submit" value="1">
            <button type="submit">Send Message</button>
        </form>
    </article>
<?php endwhile; ?>
</main>

<?php get_footer(); ?>
Step 2: Assign the Template to a Page
Go to Pages > Add New, create a page called “Contact”, and in the Page Attributes panel on the right, set the Template to “Contact Page”. Publish or save as draft. Visit the page and your form will be there.
Why wp_mail() Sometimes Fails
By default, WordPress sends email through PHP’s mail() function, which many hosting providers either block or route poorly. If your test submissions do not arrive, install an SMTP plugin like WP Mail SMTP (free tier is fine) or configure SMTP credentials in wp-config.php. This is one plugin addition that genuinely helps and is separate from form handling.
Method 2: The Gutenberg Form Block (WordPress 6.4+)
WordPress 6.4 shipped with a native Form block in the block editor. It is not available in older versions and it requires a block theme (like Twenty Twenty-Four or Astra with FSE support) to get the full experience, but you can also use it in hybrid themes via the block editor.
How to Use It
- Open any page in the block editor.
- Click the + block inserter and search for “Form”.
- You will see a Form block. Insert it.
- Inside the Form block, add child blocks: Name field, Email field, Text area for message, Submit button.
- In the Form block settings panel on the right, set the submission action to “Email” and enter your recipient address.
- Save the page.
There is a catch. The native Form block was experimental in 6.4 and its behavior depends on the Gutenberg plugin being active or on the specific WordPress version. As of WordPress 6.5 and 6.6, the Form block is available under the Gutenberg plugin but not yet merged into core for general use. Check your block inserter: if you see a Form block, you have it. If not, you may need to install the Gutenberg plugin (which adds bleeding-edge blocks before they hit stable releases).
For most beginners on a stable WordPress installation, the Gutenberg Form block is not reliably available without either the Gutenberg plugin or a specific theme that bundles it. Keep this in mind before banking on it.
Method 3: Theme-Built-In Contact Forms
Several popular free themes ship contact form functionality as part of their own module system. You do not need a separate plugin at all.
Astra Theme
Astra pairs with Starter Templates (the official companion plugin) and many of those templates include a contact form page built with WPForms Lite, which installs automatically. However, Astra itself does not ship a standalone contact form module. If you want zero extra plugins, you still need Method 1 or Method 5 with Astra.
GeneratePress with GenerateBlocks
GeneratePress through its Elements module lets you inject PHP code into any template location. This means you can drop the custom form code from Method 1 directly into a GeneratePress Element without editing theme files. The result is a native-feeling form tied entirely to the theme’s module system.
OceanWP
OceanWP’s premium Ocean Extra plugin includes a Contact block in its Elementor and Gutenberg integrations, but the free version does not provide a standalone contact form. Again, for a truly no-plugin approach with OceanWP, you fall back to Method 1 or Method 5.
The theme-built-in option is best when you are already invested in a theme’s ecosystem and it genuinely ships form capability. Verify before assuming.
Method 4: Embed a Free Tally or Google Form
The simplest no-plugin option: build your form somewhere else and embed it with an iframe. Two tools are especially popular for this.
Tally.so
Tally is a free form builder with a generous free tier that includes unlimited forms and submissions. Build your contact form at tally.so, click Share, then copy the Embed code. In WordPress, drop a Custom HTML block on your contact page and paste the iframe code:
<iframe
  data-tally-src="https://tally.so/embed/YOUR_FORM_ID?alignLeft=1&hideTitle=1"
  loading="lazy"
  width="100%"
  height="400"
  frameborder="0"
  marginheight="0"
  marginwidth="0"
  title="Contact form"
></iframe>
<script>var d=document,w="https://tally.so/widgets/embed.js",v=function(){"undefined"!=typeof Tally?Tally.loadEmbeds():d.querySelectorAll("iframe[data-tally-src]:not([src])").forEach((function(e){e.src=e.dataset.tallySrc}))};if("undefined"!=typeof Tally)v();else if(d.querySelector('script[src="'+w+'"]')==null){var s=d.createElement("script");s.src=w,s.onload=v,s.onerror=v,d.body.appendChild(s);};</script>
Submissions go directly to your Tally account where you can view them, export them as CSV, and set up email notifications. No WordPress plugin involved.
Google Forms
Google Forms is free, works with any Google account, and sends submissions to a Google Sheet automatically. Build your form at forms.google.com, click the three-dot menu, choose Embed, and copy the iframe code. Paste it into a Custom HTML block. The iframe approach works on any WordPress version.
The downside of both options: the form styling will not automatically match your theme. Tally has better customization options and can match a specific color scheme. Google Forms has more limited visual customization.
Handling Form Submissions Properly
Whether you use Method 1 or build something similar, these three practices keep your form secure and functional.
Nonce Verification
A nonce (number used once) is a one-time security token that confirms the form submission came from your own site and not from an external attacker doing a cross-site request forgery (CSRF) attack. The code in Method 1 already includes this:
// In the form:
<?php wp_nonce_field( 'contact_form_action', 'contact_nonce' ); ?>

// In the processing code:
wp_verify_nonce( sanitize_text_field( wp_unslash( $_POST['contact_nonce'] ) ), 'contact_form_action' );
Never skip this step on a hand-coded form. Security gaps in your contact form can become entry points for attackers. If you ever find your site behaving strangely after receiving unexpected form submissions, read our guide on how to fix a hacked WordPress site.
Sanitization Before Using Input
Use WordPress’s built-in sanitization functions on every piece of user input before doing anything with it:
sanitize_text_field()for single-line textsanitize_email()for email addressessanitize_textarea_field()for multi-line textwp_unslash()before sanitizing to handle magic quotes
Then use esc_html(), esc_attr(), or esc_textarea() when outputting values back to the browser.
Using wp_mail() Correctly
The wp_mail() function signature is:
wp_mail( string $to, string $subject, string $message, string|array $headers = '', string|array $attachments = array() )Always set a Reply-To header with the submitter’s email address. That way, when you reply from your inbox, it goes to the person who contacted you rather than back to your own admin email. Set Content-Type: text/plain for simple messages. Use text/html only if you are building an HTML email body.
Spam Protection Without a Plugin
Any public-facing form will attract spam. Three techniques work well without installing an anti-spam plugin.
The Honeypot Field
A honeypot is a form field that is invisible to real users (hidden via CSS or display:none) but visible to bots that parse raw HTML. If this field contains any value when the form submits, you know a bot filled it in. Reject the submission silently.
<!-- HTML -->
<div style="display:none;" aria-hidden="true">
    <label for="hp_field">Do not fill this in</label>
    <input type="text" id="hp_field" name="hp_field" autocomplete="off" tabindex="-1">
</div>

<?php
// PHP check on submission:
if ( ! empty( $_POST['hp_field'] ) ) {
    // Silently ignore the submission
    exit;
}
?>
This catches a large percentage of simple bots that blindly fill all form fields.
A Simple Math Question
A basic math challenge (“What is 3 + 4?”) is a lightweight human verification step that stops many bots without requiring a third-party service. Store the expected answer in a session variable or a hashed hidden field:
<?php
session_start();
$a = rand( 1, 9 );
$b = rand( 1, 9 );
$_SESSION['expected_sum'] = $a + $b;
?>

<label for="math_check">What is <?php echo $a; ?> + <?php echo $b; ?>?</label>
<input type="number" id="math_check" name="math_check" required>

<?php
// On submission:
if ( (int) $_POST['math_check'] !== (int) $_SESSION['expected_sum'] ) {
    $error = 'Incorrect answer to the math question.';
}
?>
Note: WordPress discourages direct session_start() calls. A cleaner WordPress-native approach is to store the expected value in a transient keyed to the user’s IP, then verify on submission.
Cloudflare JavaScript Challenge
If your site sits behind Cloudflare (the free plan works), you can set a specific page rule or WAF rule to apply a JavaScript challenge to your contact page URL. Visitors who pass the JS challenge get a cookie that lets them submit the form. Bots that cannot execute JavaScript never reach your form processor. This requires no code changes to WordPress at all.
In the Cloudflare dashboard, go to Security > WAF > Custom Rules, create a rule where the URI path equals /contact/ and the action is “JS Challenge”. This is one of the most effective spam blockers available at no cost.
Storing Submissions in the Database (For Developers)
If you want a searchable inbox inside WordPress rather than relying on email delivery, you can store form submissions as custom post type entries. This gives you a log of every submission directly in your dashboard.
<?php
// Register the custom post type in your theme's functions.php or a small mu-plugin
add_action( 'init', function() {
    register_post_type( 'contact_submission', array(
        'label'        => 'Contact Submissions',
        'public'       => false,
        'show_ui'      => true,
        'show_in_menu' => true,
        'supports'     => array( 'title', 'custom-fields' ),
    ) );
} );

// Save a submission on form processing
function save_contact_submission( $name, $email, $message ) {
    $post_id = wp_insert_post( array(
        'post_type'   => 'contact_submission',
        'post_title'  => sanitize_text_field( $name ) . ' - ' . current_time( 'mysql' ),
        'post_status' => 'private',
    ) );

    if ( $post_id && ! is_wp_error( $post_id ) ) {
        update_post_meta( $post_id, '_contact_name',    sanitize_text_field( $name ) );
        update_post_meta( $post_id, '_contact_email',   sanitize_email( $email ) );
        update_post_meta( $post_id, '_contact_message', sanitize_textarea_field( $message ) );
        update_post_meta( $post_id, '_contact_ip',      sanitize_text_field( $_SERVER['REMOTE_ADDR'] ?? '' ) );
    }

    return $post_id;
}
?>
After saving, you can still send a wp_mail() notification as a backup. The database entry acts as the permanent record. View submissions under the “Contact Submissions” menu item in your WordPress admin.
This approach has one important privacy implication: you are storing personal data (names, email addresses, messages) in your database. If you operate under GDPR or a similar regulation, document this in your privacy policy and build a data deletion path.
Testing the Form End-to-End
Before you call a form done, run through this checklist:
- Submit with all fields empty. Validation should prevent submission and show an error.
- Submit with an invalid email address. The email format check should catch it.
- Submit with a valid test message. Check your inbox. If nothing arrives within 2-3 minutes, check your spam folder, then check your SMTP configuration.
- Fill in the honeypot field manually (use browser DevTools to make it visible). The form should silently reject the submission.
- Check the reply address. Reply to the email notification you receive. Confirm it goes to the submitter’s address, not your admin email.
- Test on mobile. Fill out the form on a phone. Check that all fields are usable, that the keyboard dismisses cleanly, and that the success message is visible without scrolling.
- Check the confirmation message. Submitters should see a clear “message sent” confirmation. Never leave them guessing whether the form worked.
When You Should Actually Install a Plugin
The methods above cover most basic contact form needs. But there are real scenarios where a dedicated form plugin is the right call:
- File uploads. Accepting uploaded documents, images, or portfolios from applicants or clients requires proper file handling, MIME type validation, and storage management. Doing this securely from scratch is complex. Gravity Forms and WPForms Pro handle it well out of the box.
- Multi-step forms. Long forms that break across multiple screens with conditional logic (show question B only if question A was answered “yes”) are difficult to build without a plugin.
- Payment integration. If you need to collect a fee alongside form submission, Gravity Forms with the Stripe add-on or WPForms with payment fields is significantly easier than building it yourself.
- Automated notifications and confirmations. Sending different emails to different team members based on form answers, or sending personalized confirmation emails to the submitter with their submission details, requires conditional notification logic that dedicated plugins provide.
- CRM integration. Automatically pushing form submissions to HubSpot, Salesforce, Mailchimp, or ActiveCampaign is straightforward with WPForms or Gravity Forms and their official add-ons.
- Volume and reporting. If you are handling dozens of submissions per day and need charts, export to CSV, or team assignment, plugin-based submission management is more practical than a custom post type inbox.
Contact Form 7 is a good free choice for simple needs with some additional functionality. WPForms Lite covers single-site basic forms at no cost. Gravity Forms costs $59/year but is worth it on client sites where you need reliable conditional logic, payment fields, and add-on integrations.
Choosing the Right Method for Your Situation
Here is a quick reference to match each method to a use case:
| Method | Best For | Skill Level |
|---|---|---|
| Check existing plugins | Anyone who set up their site with a starter template or imported demo content | Beginner |
| HTML form + wp_mail() | Developers, anyone comfortable editing theme files | Intermediate |
| Gutenberg Form block | Block theme users on WordPress 6.4+ with Gutenberg plugin | Beginner |
| Theme built-in forms | GeneratePress Elements users, specific premium theme buyers | Beginner |
| Tally or Google Forms embed | Anyone who wants a working form in under 5 minutes with no code | Beginner |
The Tally embed is honestly the fastest path for most non-developers. It takes about 5 minutes, looks decent with minimal customization, and submissions land in a dashboard that is easier to manage than an email inbox.
The custom page template approach is the best long-term solution for a developer who wants full control, no third-party dependency, and code that they understand completely.
Whatever you build, do not skip the end-to-end test. A contact form that silently drops messages is worse than no contact form at all.
If you are working to keep your plugin count low for performance reasons, see our guide on how to speed up your WordPress site without hiring a developer. Fewer plugins means fewer HTTP requests, less database overhead, and a faster site overall. Every plugin you skip is one fewer thing to update, audit for vulnerabilities, and debug when something breaks.
Beginner WordPress Tips Block Editor Gutenberg form block WordPress contact form WordPress form without plugin
Last modified: April 29, 2026


Beginner’s Guide • How-To Guides • Site Maintenance Basics
April 29, 2026 • Views: 0
How to Moderate WordPress Comments Without Checking Them Every Day