WordPress Uploads Folder Too Large? Audit What’s Really Filling It

Your host sends the email: disk usage is at 90 percent. Your backups have started timing out. You open wp-content, see that uploads is the biggest folder by far, and the obvious conclusion is that you have too many images. So you compress a few, delete some old ones, maybe pay for a bigger plan.
Usually that is the wrong fix, because “too many images” is rarely the whole story. The uploads folder is where WordPress puts every image and every resized copy of it, and it is also where a surprising number of plugins keep logs, exports, caches and private files. Before you delete anything, you need to know which of those is actually eating the space.
This guide is an audit, done in order from safest to riskiest. You will measure the folder, find the things in it that are not media at all, work out how much of your media is really copies, and only then decide what to delete, what to stop generating and whether moving files to cloud storage is worth it. If what you want is faster image loading rather than a smaller disk bill, our guide to optimizing WordPress images for speed covers formats, compression and lazy loading, so we will not repeat that here.
Before you start: take a backup you can restore
Every step below that deletes a file is permanent. Take a full backup of files and database first, and make sure it is stored somewhere other than the server you are cleaning. If you are not sure your backups actually restore, read how to back up a WordPress site first. A cleanup that breaks images across a few hundred posts is a much bigger problem than a full disk.
Step 1: Measure what is really in there
Your hosting control panel’s file manager can show folder sizes, but it is slow on big folders. If you have SSH access, two commands tell you more in a few seconds. Run them from your WordPress root folder:
du -sh wp-content/uploads
du -h -d 1 wp-content/uploads | sort -h
The first gives you the total. The second lists every folder directly inside uploads, sorted smallest to largest, so the biggest offenders end up at the bottom of your screen.
What you want to notice is the split between two kinds of folder:
- Year folders (
2024,2025,2026). These hold the files in your Media Library, organized by upload month, which is the WordPress default. - Everything else. Named folders created by plugins and themes. They are not your media library, and they often do not show up in the Media Library screen at all.
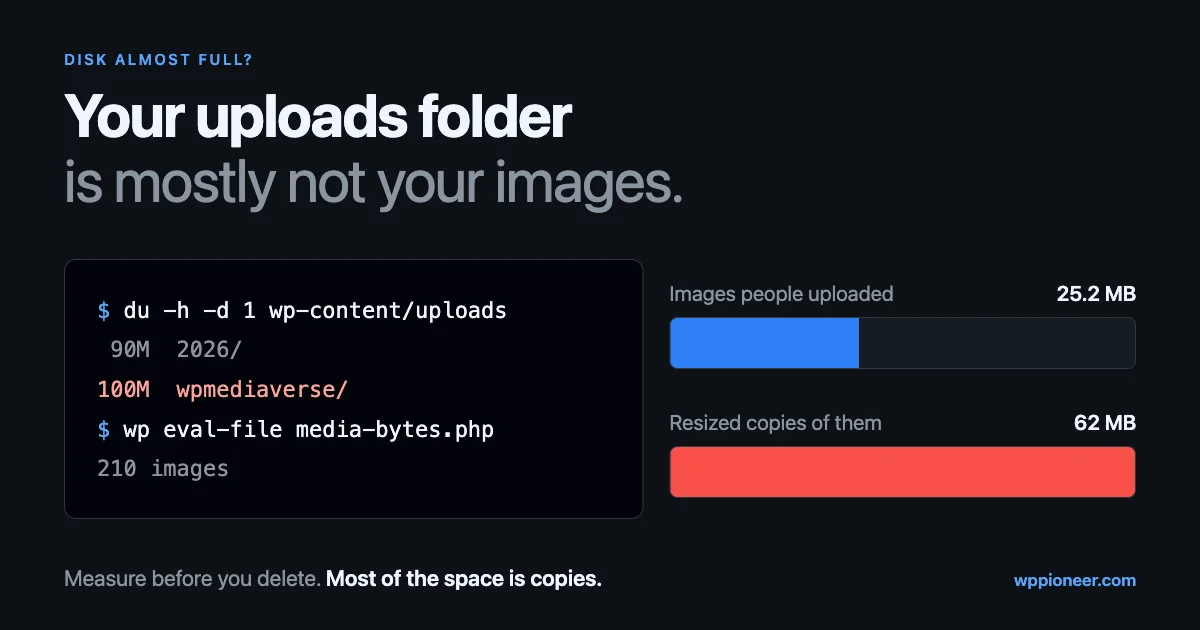
Here is what that looked like on one of our own test sites, a community and course site with a few plugins installed:
392K    wp-content/uploads/wpmediaverse-documents
544K    wp-content/uploads/learnomy-protected
636K    wp-content/uploads/groundhogg
 90M    wp-content/uploads/2026
100M    wp-content/uploads/wpmediaverse
193M    wp-content/uploads
Less than half of that folder is the Media Library. The largest single folder belongs to a plugin that stores member uploads separately. Deleting “old images” from the Media Library screen would never have touched it.
On a multisite network, each subsite’s files live in uploads/sites/<site-id>/, so run the second command one level deeper to see which subsite is growing.
Step 2: Find the things that are not media
Plugin folders are not automatically junk. Some of them hold the only copy of files your business depends on. The job here is to identify each one before deciding anything.
Files you must never bulk delete
WooCommerce is a good example of both kinds. It writes its log files to uploads/wc-logs/ by default, and it keeps the files customers pay to download in uploads/woocommerce_uploads/. WooCommerce even adds both paths to your site’s virtual robots.txt as disallowed. Old logs can be cleared from WooCommerce > Status > Logs. The downloads folder holds your product files, and deleting it breaks every download link you have ever sold.
The same logic applies to folders like learnomy-protected in the example above: a protected folder usually means files that are deliberately kept out of public view, such as course materials or certificates. For any plugin folder you do not recognize, find out which plugin created it, then check that plugin’s own settings for a cleanup or retention option. Plugin settings screens know what is safe to remove. A file manager does not.
Backups and exports hiding in uploads
Some backup, migration and export tools write their archives inside wp-content, and a surprising number of site owners have months of old backup files sitting on the same server they are meant to protect. That is bad twice over: it wastes space, and a backup stored next to the site disappears with the site. Look for large archives and database dumps:
find wp-content/uploads -type f \( -name '*.zip' -o -name '*.gz' -o -name '*.tar' -o -name '*.sql' -o -name '*.log' \) -size +5M -exec ls -lh {} \;Each file this lists should either belong to a tool you still use, with its retention set sensibly, or be downloaded to safe storage and removed from the server.
Files that should not be there at all
The uploads folder is for files people download, not code that runs. Run this too:
find wp-content/uploads -type f -name '*.php'Some plugins place a small index.php containing nothing but a comment in their folders to stop directory listing, and that is normal. Anything else, especially a PHP file with a random name inside a year folder, is a warning sign that deserves a proper look. Our guide to fixing a hacked WordPress site explains what to do if you find one. Do not just delete it and move on, because whatever put it there is still on the site.
Step 3: Work out how much of your media is copies
Now look inside the year folders. When you upload one image, WordPress does not store one file. It stores the file you uploaded, then creates a resized copy for every image size registered on the site. Core registers thumbnail, medium, medium_large, large, 1536x1536 and 2048x2048, and your theme and plugins usually add more. Copies are only made at sizes smaller than the original, so a small image gets fewer.
You can see what is registered right now with WP-CLI (our WP-CLI guide covers installing and using it):
wp media image-sizeThat list tells you what WordPress will generate from now on. It does not tell you what is already on disk, and the difference matters. The sizes that were created for every past upload are recorded in each image’s attachment metadata, including sizes from themes and plugins you uninstalled years ago.
This script reads that metadata for every image and adds up the real file sizes on disk per image size. It only reads, it changes nothing. Save it as media-bytes.php outside your web root and run it with wp eval-file media-bytes.php:
<?php
$bytes = array( 'full' => 0, 'original' => 0 );
$count = 0;
$page  = 1;
do {
    $ids = get_posts( array(
        'post_type'      => 'attachment',
        'post_status'    => 'inherit',
        'post_mime_type' => 'image',
        'posts_per_page' => 500,
        'paged'          => $page++,
        'fields'         => 'ids',
    ) );
    foreach ( $ids as $id ) {
        $meta = wp_get_attachment_metadata( $id );
        $file = get_attached_file( $id );
        if ( ! $meta || ! $file ) {
            continue;
        }
        $count++;
        $dir            = dirname( $file );
        $bytes['full'] += (int) @filesize( $file );
        if ( ! empty( $meta['original_image'] ) ) {
            $bytes['original'] += (int) @filesize( $dir . '/' . $meta['original_image'] );
        }
        foreach ( (array) ( $meta['sizes'] ?? array() ) as $name => $size ) {
            $bytes[ $name ] = ( $bytes[ $name ] ?? 0 ) + (int) @filesize( $dir . '/' . $size['file'] );
        }
    }
    wp_cache_flush_runtime();
} while ( $ids );
arsort( $bytes );
echo $count, " images\n";
foreach ( $bytes as $name => $b ) {
    printf( "%-16s %10s\n", $name, size_format( $b, 1 ) );
}
It processes images 500 at a time and clears WordPress’s in-memory cache between batches, so it will not run out of memory on a large library. If your site is heavy enough that WP-CLI itself fails while loading plugins, add --skip-plugins --skip-themes: the script only uses core functions.
Here is the output from the same test site:
210 images
full                25.2 MB
reign-featured-large    14.3 MB
medium_large        13.3 MB
large               11.1 MB
woocommerce_single     8.7 MB
reign-thumb          5.5 MB
woocommerce_thumbnail     3.9 MB
medium               2.9 MB
thumbnail            1.3 MB
woocommerce_gallery_thumbnail   967.8 KB
original              0.0 B
Add up everything except full and the resized copies come to about 62 MB, against 25 MB of the images people actually uploaded. The copies take roughly two and a half times the space of the images themselves. Two of the largest rows come from a theme’s sizes and three from WooCommerce. None of that is visible from the Media Library screen, where every one of those 210 images looks like a single file.
Compare this output with wp media image-size. Any size that appears here but is no longer registered is dead weight: files generated for a theme or plugin that is no longer generating them, and probably no longer displaying them.
Step 4: Understand the “-scaled” originals before touching them
The original row in the script needs its own explanation, because it is the one people get wrong.
Since WordPress 5.3, when you upload an image wider or taller than a threshold, WordPress creates a smaller version and uses that as the main image. The threshold is 2560 pixels by default, set through the big_image_size_threshold filter. The new main file gets -scaled added to its name, like holiday-photo-scaled.jpg.
The file you originally uploaded is not deleted. WordPress records its name in the attachment metadata as original_image, and developers can get its path with wp_get_original_image_path(). A comment in core’s image code explains why it keeps it: the resized copies are generated from the original image “for best quality,” not from the scaled version.
So a site where people upload photos straight from a modern phone or camera stores each of those photos at least twice at large sizes: the untouched original and the scaled main image. On a photography or real estate site, the original row can be the biggest line in the report. On our test site it was zero, because nothing uploaded there crossed the threshold.
What you can do about it:
- Stop it happening for new uploads. Resize photos before uploading. That is the safest fix, and it also makes uploads faster for you.
- Change the threshold. A developer can change or disable it through the filter. Disabling it means huge originals become the main image, which is usually worse for visitors, so treat that as a deliberate choice rather than a space-saving trick.
- Be careful removing existing originals. WordPress uses the original when it regenerates sizes and when you edit an image in the Media Library. Removing originals means any future regeneration works from an already-reduced image. If you do it, do it with a tool that updates the attachment metadata, never by deleting files by hand.
Step 5: Remove sizes nothing uses any more
Old image sizes from previous themes are often the easiest large win. They are also the step most likely to break images if you rush it.
Check whether old sizes are still linked in your content
When an image is inserted into a post, the HTML in the post content points to a specific file, including its dimension suffix, such as team-photo-1170x658.jpg. If you delete that size, the image in that post shows as broken. Deleting a size is not reversible by regenerating, because a size that is no longer registered will not be recreated.
For each dead size, find its dimensions from the files in a year folder, then count posts that still reference them. For example, for a size that produced files ending in -1170x658:
wp db query "SELECT ID, post_title FROM $(wp db prefix)posts WHERE post_status = 'publish' AND post_content LIKE '%-1170x658.%'"If this returns posts, those images need to be updated to a size you are keeping before the old files go. If it returns nothing, the size is only taking up space.
Delete the unregistered sizes
WP-CLI’s media regenerate command can do this. Its documented options are worth reading exactly, because two of them sound similar:
--delete-unknown: “Only delete thumbnails for old unregistered image sizes.”--skip-delete: “Skip deletion of the original thumbnails. If your thumbnails are linked from sources outside your control, it’s likely best to leave them around. Defaults to false.”--only-missing: “Only generate thumbnails for images missing image sizes.”
That last line of the --skip-delete description is the warning to take seriously. A plain wp media regenerate deletes existing thumbnails as it rebuilds. Images you linked from newsletters, social posts, other sites or a page builder’s saved layouts can break without any sign inside WordPress.
Test on a staging copy first. Then run it on a handful of attachment IDs on the live site, check those images on the front end, and only then run it across the library, preferably at a quiet time of day.
Stop generating sizes you do not need
Removing old files only helps if new uploads stop recreating the problem. Deciding which of your current sizes are actually needed depends on your theme’s layouts, which is covered in the “Understanding Registered Image Sizes” section of our image optimization guide. The short version: if a size is registered by your theme or a plugin, removing it from code is a developer job, and your front end should be checked afterwards.
Step 6: Check for duplicate formats
Image optimization plugins often create a WebP or AVIF version of each image and keep the JPEG or PNG beside it, so browsers that cannot read the newer format still get an image. Some also keep an untouched backup copy of every image they compress so you can undo it. Each of those choices can multiply a library’s size again.
On a Linux server, this totals the space used by one format:
find wp-content/uploads -type f -name '*.webp' -printf '%s\n' | awk '{ s += $1 } END { printf "%.1f MB\n", s / 1048576 }'Swap webp for avif, jpg or png to compare. If your optimizer keeps backups of originals, its settings page will say where. Once you are happy with the compressed results, that backup folder is usually the single largest thing you can safely clear, from inside the plugin.
Step 7: “Unattached” does not mean “unused”
The Media Library’s Unattached filter looks like a list of files you can delete. It is not.
An attachment is “attached” only if it was uploaded while editing a specific post. Plenty of images in active use are never attached to anything:
- Your site logo and site icon, chosen in the Site Editor or Customizer
- Images picked from the library into a different post than the one they were uploaded to
- WooCommerce product gallery images added from the library
- Images used in widgets, menus, page builder layouts and theme settings
- Images referenced from CSS as backgrounds
Deleting by “Unattached” removes some genuinely unused files and a random selection of used ones. If you want to clean up unused media, use a tool that scans your content, options and page builder data for references before deleting, run it on staging first, and keep the backup from the start of this guide until you have clicked around the site for a few days.
Step 8: Decide whether offloading is worth it
If you have done everything above and the library is still large because you genuinely have a lot of media, moving files to object storage is the next option. It is also often suggested as the first step, which is how people end up paying cloud storage bills for 62 MB of thumbnails nobody displays.
The most widely used plugin for this is WP Offload Media Lite. According to its WordPress.org page, the free version copies media to Amazon S3, DigitalOcean Spaces or Google Cloud Storage and rewrites media URLs to point at the bucket or your CDN. It also has an option to remove files from your server once they are copied. Two details on that page shape whether it fits your situation:
- “Only newly uploaded files will be copied to and served from the bucket.” Moving your existing library is part of the paid version.
- Removing local copies is optional, and until you turn it on, offloading does not reduce disk usage at all. It adds a second copy somewhere else.
Things to weigh before you commit:
- The cost moves, it does not vanish. You pay for storage and for data transfer out of the bucket. For a small site on a plan with plenty of disk, that is often more expensive than the space it frees.
- Your backups change. A normal site backup no longer contains your media. The bucket needs its own backup or versioning, or losing it means losing every image.
- Clean first, offload second. Everything you remove in steps 2 to 7 is something you will not pay to store and transfer every month.
- Private files need care. Anything that should only be visible to logged-in users, customers or members needs a setup that keeps it private in the bucket too, not just hidden on your site.
For a broader look at media library habits, including when a CDN is enough without offloading anything, see how to use the Media Library without slowing down your site.
Community sites: when members fill the disk for you
Everything above assumes you control what gets uploaded. On a membership or community site, you do not. Every member who adds a profile photo, a cover image, an album or a video is adding to your uploads folder, and on an active community that growth is steady and entirely outside your editorial control. That is exactly the situation in the test site output earlier, where the member media folder was bigger than the entire Media Library.
We build BuddyNext, a community plugin for WordPress, and its profile media and albums run on our MediaVerse plugin, which handles member uploads and processing. MediaVerse Pro adds two features aimed squarely at this problem:
- Quota packages set limits per member for image count, video count, audio count and total storage, and can be mapped to user roles or membership levels from MemberPress, Paid Memberships Pro or WooCommerce Memberships. Members see a usage bar on the upload page, and uploads past a limit are refused with a message explaining which limit was hit.
- Cloud storage sends new public uploads to Amazon S3 or BunnyCDN, and switching drivers does not break existing media, which keeps serving from wherever it was stored.
One detail from the documentation is worth knowing up front, and it matches the private files point above: only public media is eligible for cloud storage. Members-only, friends-only, private and group media, including their thumbnails and WebP or AVIF variants, stays on your server so every request can be permission-checked. On a community where most media is private, quotas will do more for your disk than offloading will. MediaVerse itself is a free download, and quotas and cloud storage come with MediaVerse Pro.
The uploads audit checklist
- Take a full backup and store it off the server.
- Measure the total and per-folder sizes with
du. - Split year folders (Media Library) from plugin folders.
- Identify each plugin folder and use that plugin’s own cleanup settings. Never delete download or protected folders.
- Find and move old backup archives, exports and large logs off the server.
- Check for PHP files in uploads and investigate anything unexpected.
- Run the per-size script and compare it with
wp media image-size. - Check the
originalrow and resize large photos before uploading from now on. - For each unregistered size, check post content for references before deleting.
- Test
wp media regenerate --delete-unknownon staging, then on a few images, then the whole library. - Measure duplicate formats and clear optimizer backups from inside the plugin.
- Do not bulk delete “Unattached” media.
- Only then, decide whether offloading is cheaper than the disk you still need.
- On community sites, set upload quotas before growth forces the decision.
Most uploads folders are not full of images. They are full of copies of images, files that were never media, and things nobody remembered to switch off. Measure first and you will usually find that the space you need was already on the server.